Say no to "flickering" UI: useLayoutEffect, painting and browsers story
How to change elements base on DOM measurements: what is the problem with useEffect, how useLayoutEffect fixes it, what is browser painting, and how SSR plays a role here.
Community-supported translations : 日本語
Nadia Makarevich

Let’s talk a bit more about DOM access in React. In the previous article (Refs in React: from access to DOM to imperative API) we covered how to do it with Ref, and learned everything about Ref as a bonus. There is, however, another very important, although quite rare, topic when it comes to dealing with DOM: changing elements based on real DOM measurements like the size or position of an element.
So, what is the problem with it, exactly, and why are "normal" tactics not good enough? Let’s do some coding and figure it out. In the process, we’ll find out everything that we need to know about useLayoutEffect, when and why we’d want to use it instead of useEffect, how browsers render our React code, what is painting, why all of this matters and how SSR plays a role here.
What is the problem with useEffect?
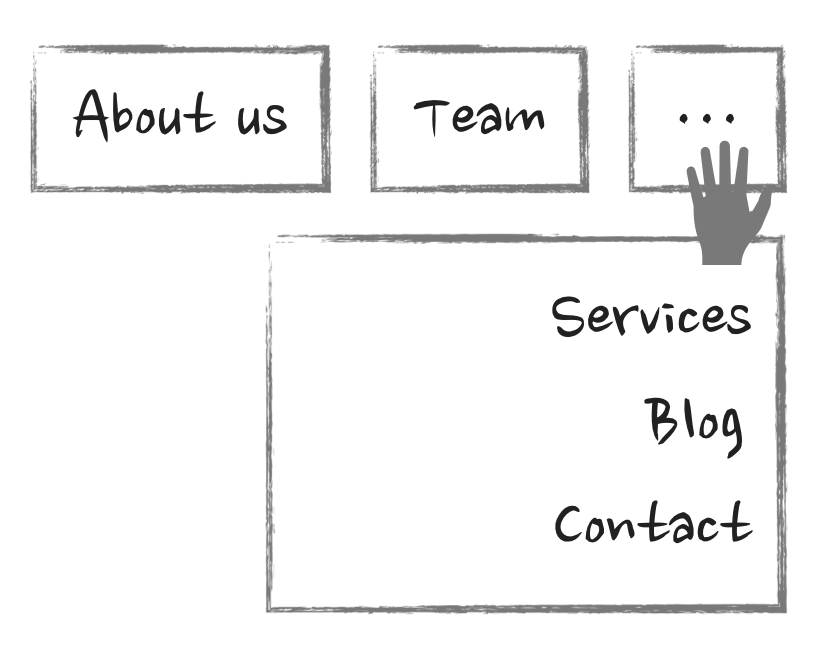
It’s coding time! Let’s do something fancy today: a responsive navigation component. It can render a row of links and can adjust the number of those links based on the container size.

And if some links don’t fit, show a “more” button that will open them in a dropdown menu if clicked.
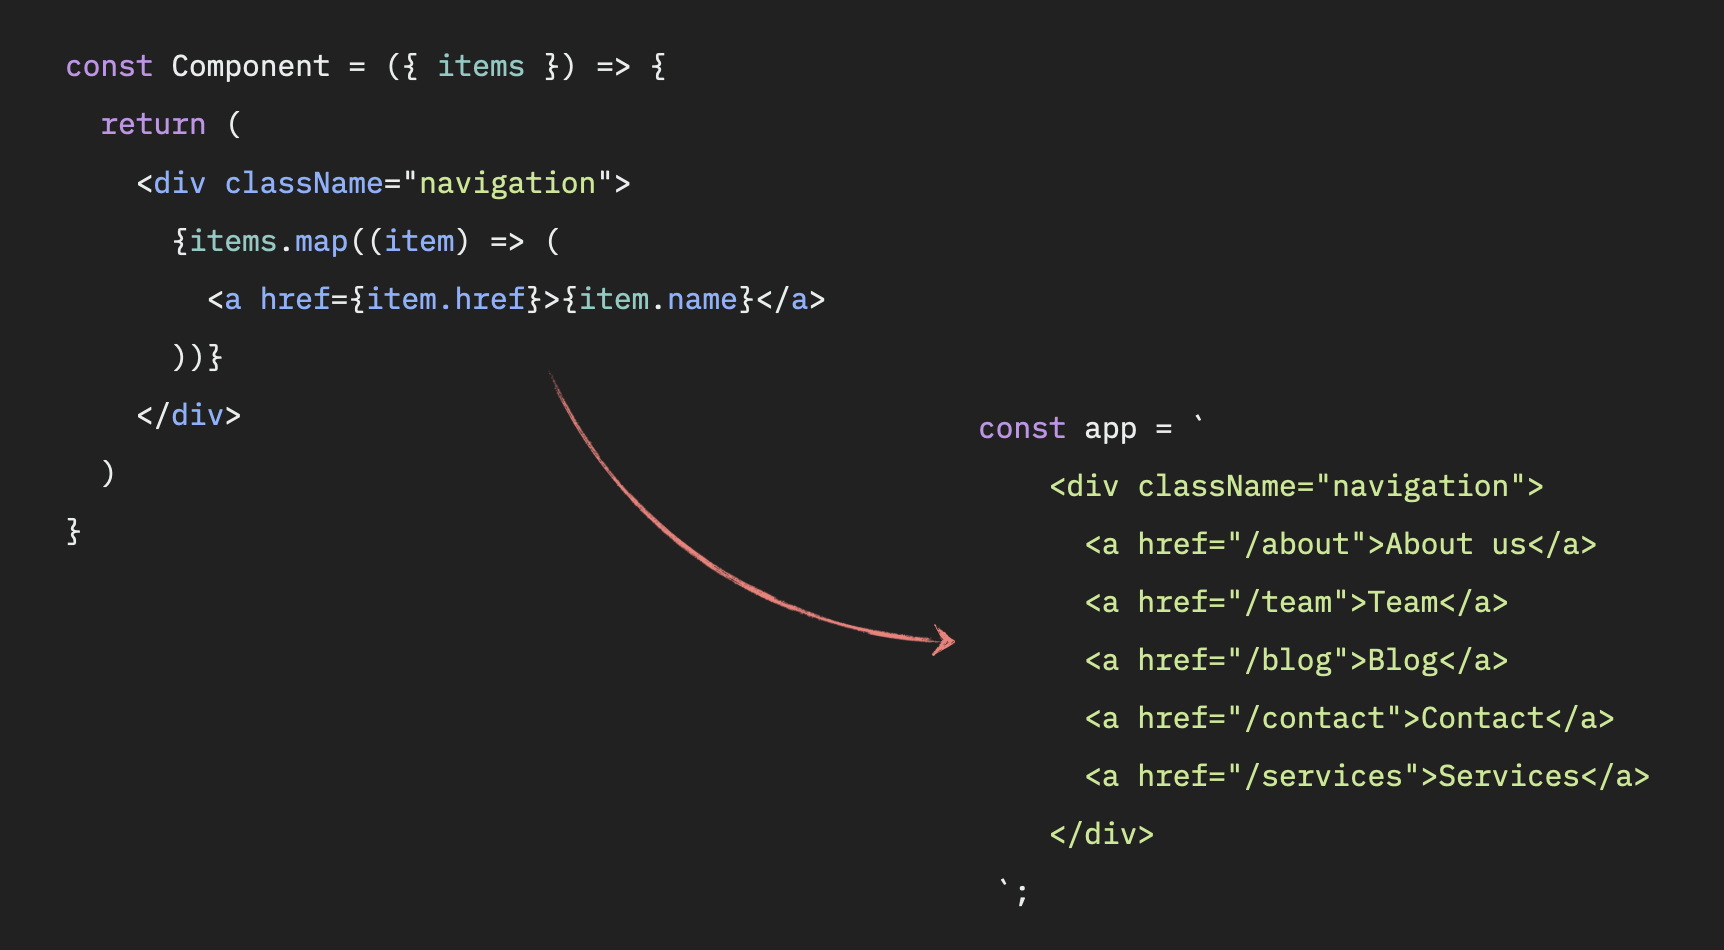
Now, the component itself. It’s going to be just a component that accepts an array of data and renders proper links:
const Component = ({ items }) => {return (<div className="navigation">{items.map(item => <a href={item.href}>{item.name}</a>)}</div>)}
And now, how do we make it responsive? The problem here is that we need to calculate how many items will fit in the available space. In order to do that, we need to know the width of the container where they are rendered and the dimensions of every item. We can’t assume anything in advance here, by counting letters for example: how text renders in the browser will be very much dependent on the font that is used, language, browser, and probably the phases of the moon.
The only way to get the actual sizes here is to make the browser render those items and then extract the sizes via a native javascript API, like getBoundingClientRect.
We’d have to do it in a few steps. First, get access to the elements. We can create a Ref and assign it to the div that wraps those items:
const Component = ({ items }) => {const ref = useRef(null);return (<div className="navigation" ref={ref}>...</div>)}
If you’re not comfortable with Refs and how they work with DOM, here is an article for you: Refs in React: from access to DOM to imperative API
Second, in useEffect grab the div element and get its size.
const Component = ({ items }) => {useEffect(() => {const div = ref.current;const { width } = div.getBoundingClientRect();}, [ref]);return ...}
Third, iterate over the div’s children and extract their widths into an array.
const Component = ({ items }) => {useEffect(() => {// same code as before// convert div's children into an arrayconst children = [...div.childNodes];// all the widthsconst childrenWidths = children.map(child => child.getBoundingClientRect().width)}, [ref]);return ...}
Now, all we need to do is iterate over that array, sum the widths of the children, compare those sums with the parent div, and find the last visible item as a result.
But wait, there is one thing we forgot: the “more” button. We need to take its width into account as well. Otherwise, we might find ourselves in a situation where a few items fit, but the “more” button doesn’t.

And again, we can only get its width if we render it in the browser. So we have to add the button explicitly during the initial render:
const Component = ({ items }) => {return (<div className="navigation">{items.map(item => <a href={item.href}>{item.name}</a>)}<!-- add the "more" button after the links explicitly --><button id="more">...</button></div>)}
If we abstract away all the logic of calculating widths into a function, we’ll have something like this in our useEffect:
useEffect(() => {const itemIndex = getLastVisibleItem(ref.current)}, [ref]);
Where getLastVisibleItem function does all the math and returns us a single number - the index of the last link that can fit into the available space. I’m not going to dive into the logic itself. There is a million ways to do it, it will be available in the final code example a little further on.
The important thing here is that we’ve got that number. What should we do next from the React perspective? If we leave it as is, all links and the “more” button will be visible. And there's only one solution here - we need to trigger an update of the component and make it remove all those items that are not supposed to be there.
And there is pretty much the only way to do it: we need to save that number in the state when we get it:
const Component = ({ items }) => {// set the initial value to -1, to indicate that we haven't run the calculations yetconst [lastVisibleMenuItem, setLastVisibleMenuItem] = useState(-1);useEffect(() => {const itemIndex = getLastVisibleItem(ref.current);// update state with the actual numbersetLastVisibleMenuItem(itemIndex);}, [ref]);}
And then, when rendering the menu, take that into account:
const Component = ({ items }) => {// render everything if it's the first pass and the value is still the defaultif (lastVisibleMenuItem === -1) {// render all of them here, same as beforereturn ...}// show "more" button if the last visible item is not the last one in the arrayconst isMoreVisible = lastVisibleMenuItem < items.length - 1;// filter out those items which index is more than the last visibleconst filteredItems = items.filter((item, index) => index <= lastVisibleMenuItem);return (<div className="navigation"><!-- render only visible items -->{filteredItems.map(item => <a href={item.href}>{item.name}</a>)}<!-- render "more" conditionally -->{isMoreVisible && <button id="more">...</button>}</div>)}
That’s about it! Now, after state is updated with the actual number, it will trigger a re-render of the navigation, and React will re-render items and remove those that are not visible. For a “proper” responsive experience we also would need to listen for the resize event and re-calculate the number, but I’ll leave it up to you to implement.
Check out the full working example in the codesandbox below. With resize 😊. Only don’t get too excited just yet: there is one major flaw in the user experience here.
Try to refresh it a few times, especially with slowed down CPU. Unfortunately, there is a horrible flash of content there. You should be able to clearly see that initial render - when all the items in the menu and the “more” button are visible. We definitely need to fix it before it goes into production.
Fixing it with useLayoutEffect
The reason for that flash should be pretty obvious: we render those items and make them visible before removing unnecessary items. And we have to render them first, otherwise, fancy responsiveness won’t work. So one possible fix for this would be to still render that first pass, but invisibly: with opacity set to 0, or in some div somewhere outside of the visible area. And only after we extract the dimensions and the magic number, make them visible. This is how we used to handle cases like this in the past.
In React version from ~16.8 (the one with the hooks) however, all that we need to do is replace our useEffect hook with useLayoutEffect.
const Component = ({ items }) => {// everything is exactly the same, only the hook name is differentuseLayoutEffect(() => {// the code is still the same}, [ref]);}
This is pure magic, no more initial flashing, check it out:
Is it safe to do though? Why don’t we just use it everywhere instead of useEffect? The docs explicitly say that useLayoutEffect can hurt performance and should be avoided. Why is that? It also says that it is fired “before the browser repaints the screen”, which implies that useEffect is fired after. But what exactly does this mean from a practical sense? Do I need to think about low-level concepts like browser painting when writing simple dropdowns now 🤯?
To answer those questions, we need to step aside from React for a moment and talk about browsers and good old Javascript instead.
Why the fix works: rendering, painting and browsers
The first thing we need here is “browser rendering”. In React world it is also known as “painting” just to differentiate it from React’s rendering - those are very different! The idea here is relatively straightforward. Browsers don’t continuously update everything that needs to be shown on the screen in real time. It’s not like drawing on a whiteboard, where you draw lines, erase lines, write some text or sketch an owl.
Instead, it’s more like showing slides to people: you show one slide, wait for them to comprehend the genius idea on it, then transition to the next slide, and so on. If a very slow browser was asked to come up with an instruction on how to draw an owl, it could literally be the infamous picture:

Only they do it really, really fast. Normally, modern browsers try to maintain a 60 FPS rate, 60 frames per second. One slide changes to the next one ~every 13 milliseconds. This is what we refer to as “painting” in React.
The information that updates those slides is split into “tasks”. Tasks are put in a queue. The browser grabs a task from the queue and executes it. If it has more time, it executes the next task, and so on, until no more time is left in that ~13ms gap, and then refreshes the screen. And continue, non-stop, working tirelessly so that we are able to do such important things as doom-scrolling on Twitter without even noticing the effort it took.
What is a “task”? When it comes to normal Javascript, it’s everything that we put in the script tag and execute synchronously. Consider this code:
const app = document.getElementById("app");const child = document.createElement("div");child.innerHTML = "<h1>Heyo!</h1>";app.appendChild(child);child.style = "border: 10px solid red";child.style = "border: 20px solid green";child.style = "border: 30px solid black";
I grab an element by its id, put it into app variable, create a div, update its HTML, append that div to the app, and change the div’s border three times. The entire thing will be considered as just one task for the browser. So it will execute every single line, and only then draw the final result: the div with the black border.
You won’t be able to see this red-green-black transition on the screen.
What will happen if a “task” is taking longer than 13ms? Well, it’s a pity 🤷🏻♀️. The browser can’t stop it or split it. It will continue with it until it’s done, and then paint the final result. If I add 1-second synchronous delays between those border updates:
const waitSync = (ms) => {let start = Date.now(),now = start;while (now - start < ms) {now = Date.now();}};child.style = "border: 10px solid red";waitSync(1000);child.style = "border: 20px solid green";waitSync(1000);child.style = "border: 30px solid black";waitSync(1000);
we still won’t be able to see the “in-between” result. We’ll just stare at the blank screen until the browser sorts it out, and enjoy the final black border in the end. This is what we refer to as “blocking render” or “blocking painting” code.
Now, although React is just javascript, it's not executed as one single task of course. The internet would be unbearable if it was. We all would be forced to play outside and interact in person, and who wants that, really? The way to “break” a giant task like rendering an entire app into smaller ones is by using various “asynchronous” methods: callbacks, event handlers, promises and so on.
If I just wrap those style adjustments in setTimeout, even with 0 delay:
setTimeout(() => {child.style = "border: 10px solid red";wait(1000);setTimeout(() => {child.style = "border: 20px solid green";wait(1000);setTimeout(() => {child.style = "border: 30px solid black";wait(1000);}, 0);}, 0);}, 0);
then every one of those timeouts will be considered a new “task”. So the browser will be able to re-paint the screen after finishing one and before starting the next one. And we’ll be able to see the slow but glorious transition from red to green to back, rather than meditating on the white screen for three seconds.
Codesandbox with the code is here
This is what React does for us. Essentially, it’s a crazy complicated and very efficient engine that splits our giant, giant blobs of hundreds of npm dependencies combined with our own coding into the smallest possible chunks that browsers are able to process in under 13 ms (ideally).
All of this is a very brief and simplified introduction. Otherwise, this article would turn into a book by itself. A very good comprehensive guide on the topic of browser’s event loops and queues is here: Browser Event loop: micro and macro tasks, call stack, render queue: layout, paint, composite
Back to useEffect vs useLayoutEffect
And now, finally, back to useEffect vs useLayoutEffect and how to answer the questions we had at the beginning.
useLayoutEffect is something that React runs synchronously during component updates. In this code:
const Component = () => {useLayoutEffect(() => {// do something})return ...}
whatever we render inside the Component will be run with useLayoutEffect as the same “task”. React guarantees this. Even if we update state inside useLayoutEffect, which we usually think of as an asynchronous task, React still will make sure that the entire flow is run synchronously.
If we return to the “navigation” example that we implemented at the beginning. From the browser perspective, it would be just one “task”
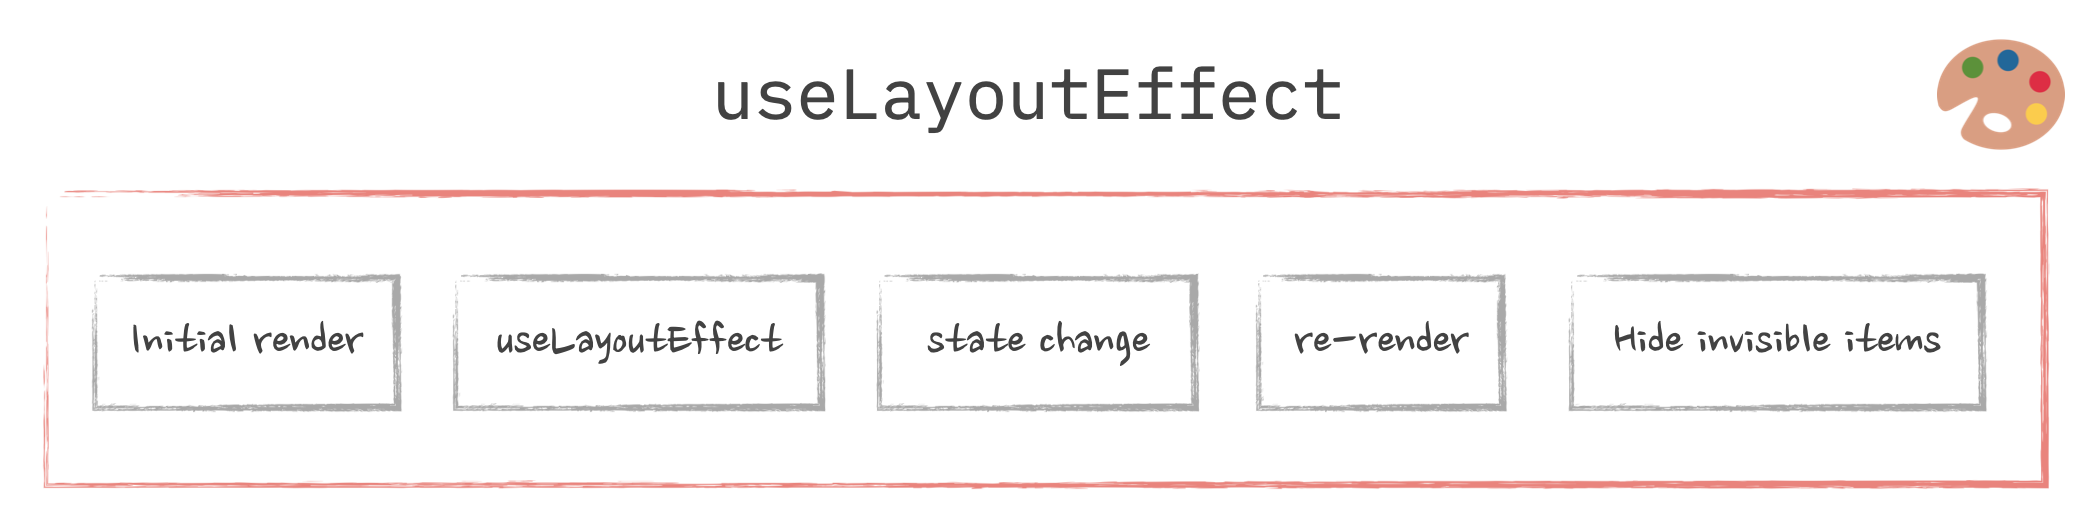
This situation is exactly the same as the red-green-black border transition that we couldn't see!
The flow with useEffect, on the other hand, will be split into two tasks:
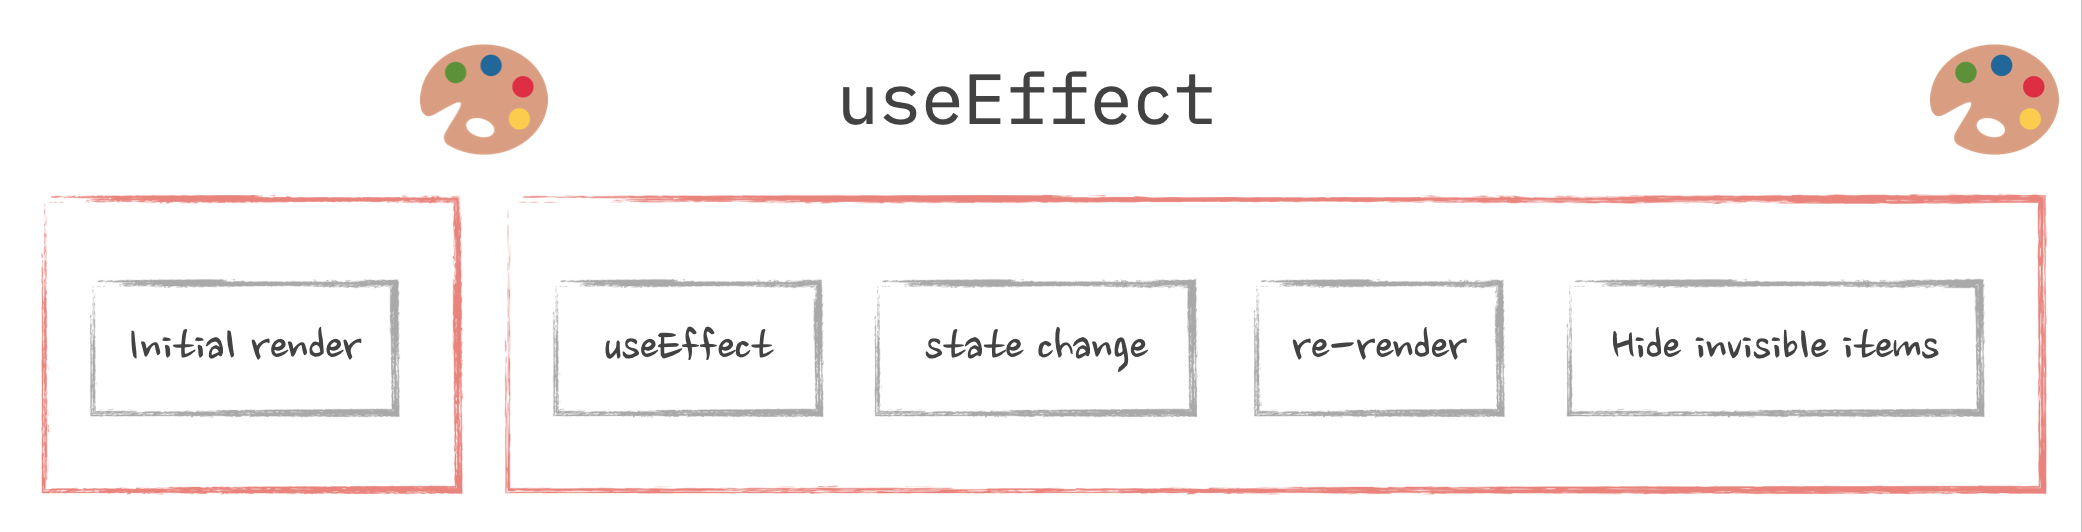
The first one renders the “initial” pass of navigation with all the buttons. And the second one removes those children that we don’t need. With screen re-paining in between! Exactly the same situation as with borders inside timeouts.
So to answer the questions we had at the beginning. Is it safe to use useLayoutEffect? Yep! Can it hurt performance? Absolutely! The last thing we need is for our entire React app to turn into one giant synchronous “task”.
Use useLayoutEffect only when you need to get rid of the visual “glitches” caused by the need to adjust the UI according to the real sizes of elements. For everything else, useEffect is the way to go. And you might not even need that one either: You Might Not Need an Effect – React
A bit more about useEffect
While the mental model of useEffect being run inside setTimeout is convenient to understand the difference, it’s not technically correct. First of all, to make the implementation details clear, React uses a postMessage in combination with requestAnimationFrame trick instead. Yeah, I didn’t know about that trick either. It's described here for those who love details: React: How does React make sure that useEffect is called after the browser has had a chance to paint?
Second, it’s not actually guaranteed to run asynchronously. While React will try to optimize it as much as possible, there are cases when it can run before the browser paint, and block it as a result. One of those cases is when you already have useLayoutEffect somewhere in the chain of updates. There is a very good investigation with lots of details if you need to understand the reasoning and how that works: useEffect sometimes fires before paint.
useLayoutEffect in Next.js and other SSR frameworks
Enough with the low-level javascript and browser stuff, let’s return to our production code. Because in “real life” all of this is not something we need to care about that often. In “real life” we’d want to just code our beautiful responsive navigation and build some nice user experience with it in some fancy framework like Next.js (or any other, this is not a Next.js promo article 😅).
And when we try to do that, the first that we’ll notice is that it doesn’t freaking work. Like at all. The glitching is still there, there is no magic anymore. Try opening this example and refreshing the page a few times. Or copy-paste the previously fixed navigation into your Next.js app if you have one.
What’s happening? 🤨
It’s SSR. Server-side rendering. A cool feature, that some frameworks support by default. And a real pain when it comes to things like this.
You see, when we have SSR enabled, the very first pass at rendering React components and calling all the lifecycle events is done on the server, before the code reaches the browser. If you’re not familiar with how SSR works, all it means is that somewhere on the backend some method calls something like React.renderToString(<App />). React then goes through all the components in the app, “renders” them (i.e. just calls their functions, they are just functions after all), and then produces the HTML those components represent.
Then this HTML is injected into the page that is going to be sent to the browser, and off it goes. Just like in the good old times, when everything was generated on the server and we used javascript only to open menus. After that, the browser downloads the page, shows it to us, downloads all the scripts (including React), runs them (including React again), React goes through that pre-generated HTML, sprinkles some interactivity on it, and our page is now alive again.
The problem here is: there is no browser yet when we generate that initial HTML. So anything that would involve calculating actual sizes of elements (like we do in our useLayoutEffect) will simply not work on the server: there are no elements with dimensions yet, just strings. And since the whole purpose of useLayoutEffect is to get access to the element’s sizes, there is not much point in running it on the server. And React doesn’t.
As a result, what we see during the very first load when the browser shows us the page that is not interactive yet, is what we rendered during the “first pass” stage in our component: the row of all the buttons, including the “more” button. After the browser has a chance to execute everything and React comes alive, it finally can run useLayoutEffect, and the buttons are finally hidden. But the visual glitch is there.
How to fix it is a user experience problem and depends entirely on what you’re willing to show to your users “by default”. We could show them some “loading” state instead of the menu. Or show one or two of the most important menu items. Or even hide the items completely and only render them on the client. It’s up to you.
One way to do it is just to introduce some “shouldRender” state variable and flip it to “true” in useEffect:
const Component = () => {const [shouldRender, setShouldRender] = useState(false);useEffect(() => {setShouldRender(true);}, []);if (!shouldRender) return <SomeNavigationSubstitude />;return <Navigation />}
useEffect will only run on the client, so the initial SSR pass will show us the substitute component. Then, the client code will kick in, useEffect will run, state will change, and React will replace it with the normal responsive navigation.
Don’t be afraid of introducing state here, and don’t try to do conditional rendering like this:
const Component = () => {// Detectign SSR by checking whether window is thereif (typeof window === undefined) return <SomeNavigationSubstitude />;return <Navigation />}
While technically typeof window === undefined would be an indication of the SSR environment (there is no window on the server), this will not work for our use case. React needs HTML coming from SSR and from the first initial render on the client to match exactly. Otherwise, your app will behave like it’s drunk. Another good investigation on this particular topic, if after all of this, you still crave more details: The Perils of Rehydration
Oooof, what was supposed to be a light and breezy “hey, this is an easy cool trick” article somehow almost turned into a rendering deep dive. Hope you’re still with me after all of this 😅 Resources that I used for this investigation and that might be helpful to dig even deeper:
- React as a UI Runtime by Dan Abramov, free your entire evening for this one
- GitHub - acdlite/react-fiber-architecture: A description of React's new core algorithm, React Fiber
- Browser Event loop: micro and macro tasks, call stack, render queue: layout, paint, composite
- Rendering Performance
- The Perils of Rehydration
- useEffect sometimes fires before paint
- You Might Not Need an Effect – React
- Render and Commit – React
Also, check out the article in video format to solidify your knowledge. Sometimes, a three-second seconds animation can explain things better than 2 paragraphs of text:
And see ya next time!
Table of Contents
Want to learn even more?

Web Performance Fundamentals
A Frontend Developer’s Guide to Profile and Optimize React Web Apps

Advanced React
Deep dives, investigations, performance patterns and techniques.
Advanced React Mini-Course
Free YouTube mini-course following first seven chapters of the Advanced React book